
Rate Limiter를 만들어보자! 2편
모든 소스는 요기서 확인가능합니다. :)
Spring Cloud Gateway를 사용해서 API Limiter 구현을 해보자! 2편
앞서 1편에서 보았던 기본도 잘 쓸 수 있으나, 조금 더 나가서 아구몬이 진화해서 그레이몬이 되듯이 Custom을 조금만 더 해주면 나름 괜찮은 RateLimiter가 될 수 있다.
Custom Redis limiter
앞에서 사용했던 Default Redis Limiter는 아래 요구사항을 구현하기가 힘든데
- 특정 사용자의 주식 조회 요청을 분당 1번으로 설정을 하고 주식 주문을 초당 1번만 가능하다던지
- 속도 문제로 복잡하고 리소스가 많이 드는 요청일 경우 분당 1번만 요청하게 한다던지
- 지금 redis에는 timestamp와 tokenKey 2개만 들어가 있는데 다른 추가적인 정보도 넣고 싶다든지
- Redis TTL를 더 길게 잡는다든지
- User 별로 요청량을 다르게 하고 싶다든지
이러한 요구사항들을 들어주는 API Limiter를 단순하면서 간단하게(평범하면서도 우아하라고 우리네 클라이언트가 실제로 들은 말) 구현을 한 번 해보자.
Custom
먼저 우리는 잘 구현되어있는RedisRateLimiter를 상속받아서 사용한다.
@Configuration
@Slf4j
public class CustomRedisRateLimiter extends RedisRateLimiter {
    ...
}
만약 User 별로 요청량을 다르게 한다면 우리는 수정해야 할 메서드가 크게 두 개가 있는데
먼저 isAllowed, loadConfiguration 이 두 개의 메서드를 수정해야 한다.
@Configuration
@Slf4j
public class CustomRedisRateLimiter extends RedisRateLimiter {
    ...

    private final Config userAConfig = new Config().setBurstCapacity(10).setReplenishRate(1).setRequestedTokens(1);
    private final Config commonUserConfig = new Config().setBurstCapacity(1).setReplenishRate(1).setRequestedTokens(1);

    @Override
    public Mono<Response> isAllowed(String routeId, String id) {
        Config routeConfig = loadConfiguration(routeId, id);

        int replenishRate = routeConfig.getReplenishRate();
        int burstCapacity = routeConfig.getBurstCapacity();
        int requestedTokens = routeConfig.getRequestedTokens();

        try {
            List<String> keys = getKeys(id);

            List<String> scriptArgs = Arrays.asList(replenishRate + "", burstCapacity + "", "", requestedTokens + "");
            Flux<List<Long>> flux = redisTemplate.execute(this.script, keys, scriptArgs);
            return flux.onErrorResume(throwable -> {
                if (log.isDebugEnabled()) {
                    log.debug("Error calling rate limiter lua", throwable);
                }
                return Flux.just(Arrays.asList(1L, -1L));
            }).reduce(new ArrayList<Long>(), (longs, l) -> {
                longs.addAll(l);
                return longs;
            }).map(results -> {
                boolean allowed = results.get(0) == 1L;
                Long tokensLeft = results.get(1);

                Response response = new Response(allowed, getHeaders(routeConfig, tokensLeft));

                if (log.isDebugEnabled()) {
                    log.debug("response: " + response);
                }
                return response;
            });
        } catch (Exception e) {
            log.error("Error determining if user allowed from redis", e);
        }

        return Mono.just(new Response(true, getHeaders(routeConfig, -1L)));
    }

    Config loadConfiguration(String routeId, String key) {
        if (key.equals("demo1234")) {
            return getConfig().getOrDefault(routeId + key, userAConfig);
        }
        return getConfig().getOrDefault(routeId, commonUserConfig);

    }
}
우리가 앞에서 UserKeyResolver에서 설정한 key가 들어오게 되는데, 이 키를 가지고 제한하고자 하는 요청량을 먼저 Config를 주입하면 끝이다.
@Configuration
@Slf4j
public class CustomRedisRateLimiter extends RedisRateLimiter {

    private final Config userAConfig = new Config().setBurstCapacity(10).setReplenishRate(1).setRequestedTokens(1);
    private final Config commonUserConfig = new Config().setBurstCapacity(1).setReplenishRate(1).setRequestedTokens(1);
    private ReactiveStringRedisTemplate redisTemplate;

    private RedisScript<List<Long>> script;

    @Autowired
    public CustomRedisRateLimiter(ReactiveStringRedisTemplate redisTemplate, RedisScript<List<Long>> script,
        ConfigurationService configurationService) {
        super(redisTemplate, script, configurationService);
        this.redisTemplate = redisTemplate;
        this.script = script;
    }

    public CustomRedisRateLimiter(int defaultReplenishRate, int defaultBurstCapacity) {
        super(defaultReplenishRate, defaultBurstCapacity);
    }

    public CustomRedisRateLimiter(int defaultReplenishRate, int defaultBurstCapacity, int defaultRequestedTokens) {
        super(defaultReplenishRate, defaultBurstCapacity, defaultRequestedTokens);
    }

    static List<String> getKeys(String id) {
        String prefix = "request_rate_limiter.{" + id;
        String tokenKey = prefix + "}.tokens";
        String timestampKey = prefix + "}.timestamp";
        return Arrays.asList(tokenKey, timestampKey);
    }

    @Override
    public Mono<Response> isAllowed(String routeId, String id) {
        Config routeConfig = loadConfiguration(routeId, id);

        int replenishRate = routeConfig.getReplenishRate();
        int burstCapacity = routeConfig.getBurstCapacity();
        int requestedTokens = routeConfig.getRequestedTokens();

        try {
            List<String> keys = getKeys(id);

            List<String> scriptArgs = Arrays.asList(replenishRate + "", burstCapacity + "", "", requestedTokens + "");
            Flux<List<Long>> flux = redisTemplate.execute(this.script, keys, scriptArgs);
            return flux.onErrorResume(throwable -> {
                if (log.isDebugEnabled()) {
                    log.debug("Error calling rate limiter lua", throwable);
                }
                return Flux.just(Arrays.asList(1L, -1L));
            }).reduce(new ArrayList<Long>(), (longs, l) -> {
                longs.addAll(l);
                return longs;
            }).map(results -> {
                boolean allowed = results.get(0) == 1L;
                Long tokensLeft = results.get(1);

                Response response = new Response(allowed, getHeaders(routeConfig, tokensLeft));

                if (log.isDebugEnabled()) {
                    log.debug("response: " + response);
                }
                return response;
            });
        } catch (Exception e) {
            log.error("Error determining if user allowed from redis", e);
        }

        return Mono.just(new Response(true, getHeaders(routeConfig, -1L)));
    }

    Config loadConfiguration(String routeId, String key) {
        if (key.equals("demo1234")) {
            return getConfig().getOrDefault(routeId + key, userAConfig);
        }
        return getConfig().getOrDefault(routeId, commonUserConfig);

    }
}
그리고 application.yml 파일에 rate-limitter customRedisRateLimiter를 추가해준다.
spring:
...
- name: RequestRateLimiter
    args:
        rate-limitter: "#{@customRedisRateLimiter}"
        key-resolver: "#{@apiKeyResolve}"
결과
Get localhost:18080/demo?userId=demo1234
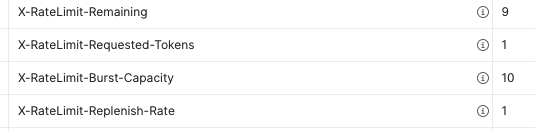
Request 요청 시 위에 설정한 userAConfig에 맞게 응답 값이 돌아오게 된다.
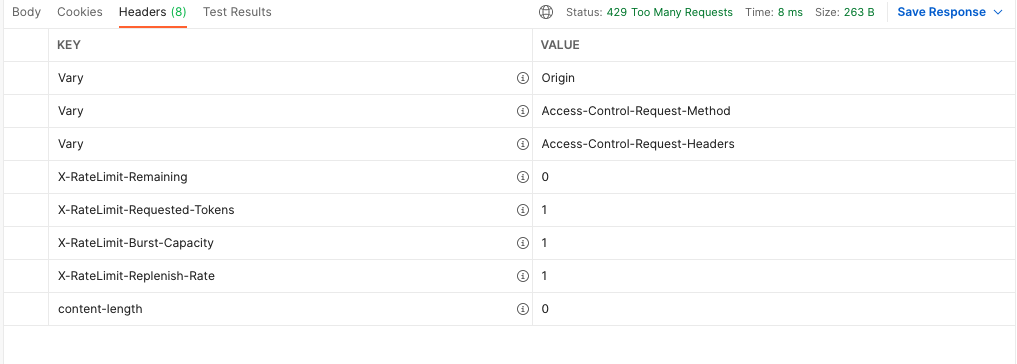
Get localhost:18080/demo?userId=test
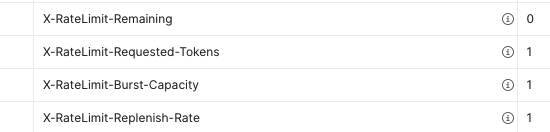
Remaining 보다 요청을 더 많이 하게 되면 429 Too Many Request 가 응답으로 오게 된다.
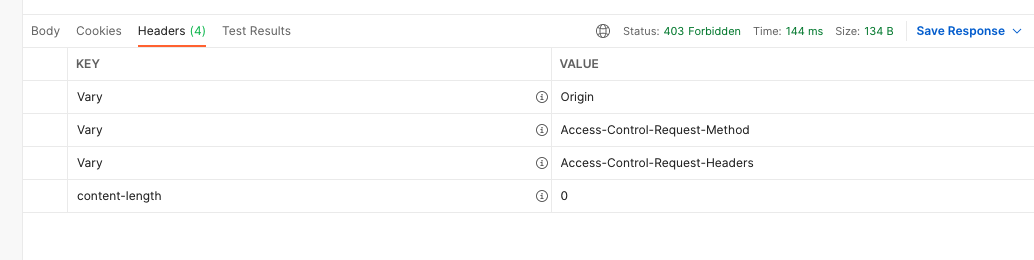
추가해도 좋을만한 옵션이 있는데, 만약 다양한 이유로 요청을 거절하고 싶을 때 예를 들어 헤더에 약속된 값이 없거나 등
그럴 때 사용할 수 있는 옵션이 deny-empty-key라는 옵션이다. (default true)이다.
이 옵션을 사용하기 위해서 __EMPTY_KEY 을 뒤로 넘겨주게 되면 FORBIDDEN 응답으로 돌려주게 된다.
@Bean
public KeyResolver apiKeyResolve() {
    if (!exchange.getRequest().getQueryParams().containsKey("userId")) {
          return Mono.just("____EMPTY_KEY__");
    }

    return Mono.just(exchange.getRequest().getQueryParams().getFirst("userId"));
}
정말 잘 작동할까?
이 부분을 확인하기 위해서 짧은 시간에 많은 부하 테스트를 해 볼 것이다. 간단하게 k6 부하 테스트 도구를 이용해서 테스트를 해 볼 겁니다.
조건 초당 1회 요청을 가능한지를 테스트한다면
limiter 설정
requestedTokens 1
burstCapacity 1
replenishRate 1
k6/loadtest.js
import http from 'k6/http';
import { check, group, sleep } from 'k6';

export const options = {
    duration: '10s',
    vus: '1',
};

const BASE_URL = 'http://localhost:18080';

export default () => {
    const limiter = http.get(`${BASE_URL}/demo?userId=test`);

    check(limiter, {
        'success limitter ': (resp) => resp.status === 200
    });
};
정말 간단한 스크립트로 보면 알겠지만
10초 동안 get요청을 한다는 스크립트이고, 결과로 200일 경우 성공으로 보겠다는 것이다.
결과
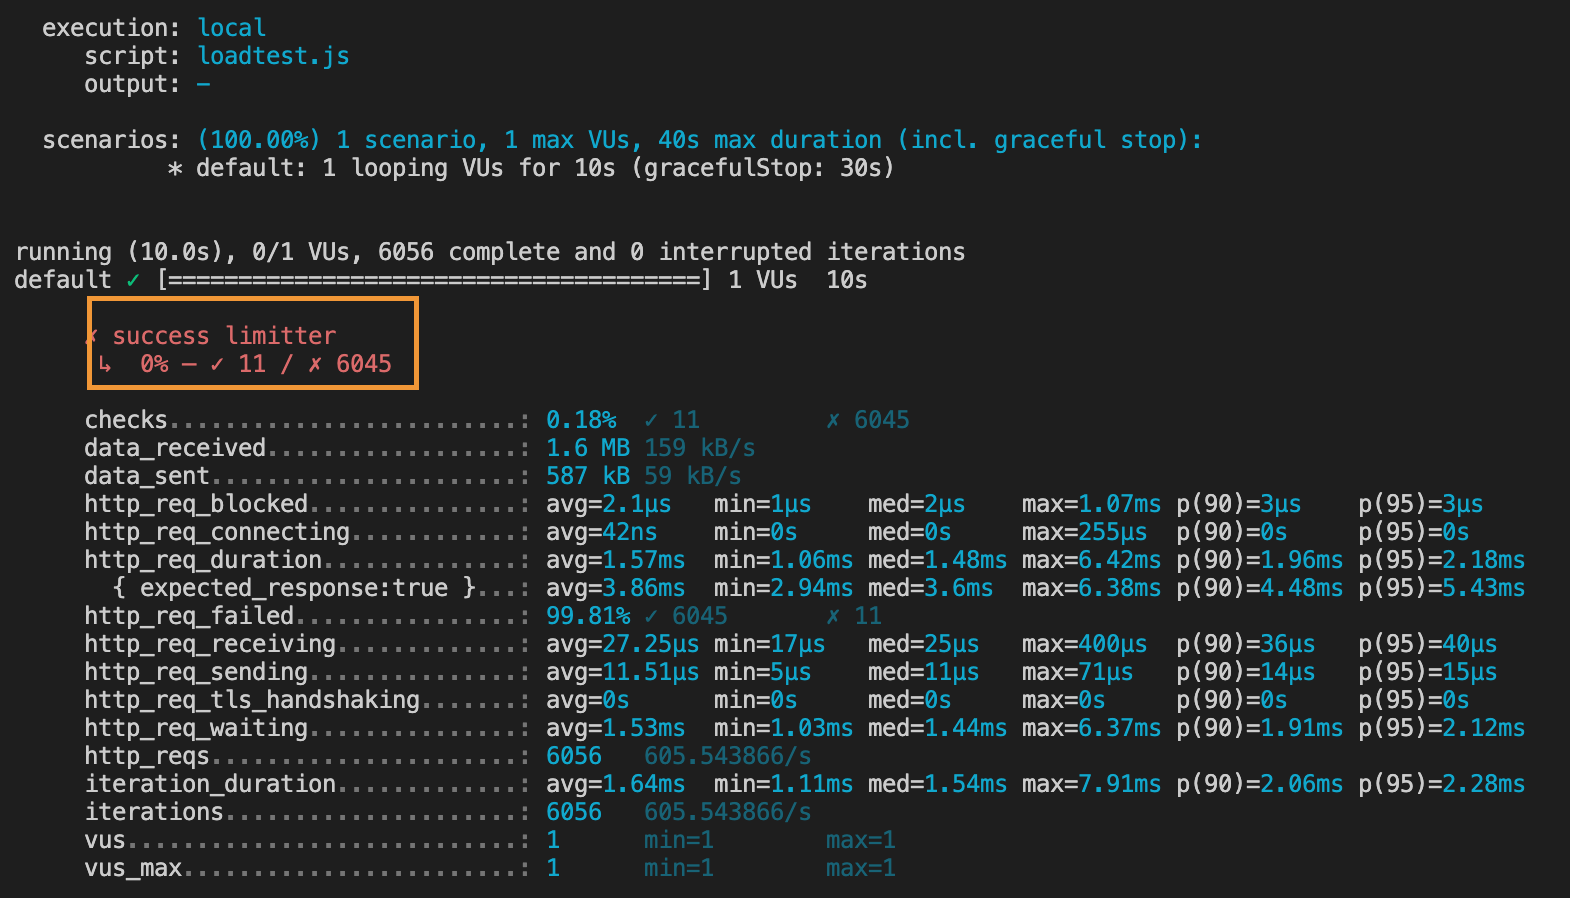
11번의 요청이 성공적으로 200으로 return 되었고, 6045번이 실패한 내역이다.
이상으로
이렇게 간단하게 RateLimiter를 구현을 해보았는떼, 처음에는 구현을 어떻게 하지라며 고민을 하였는데,
Redis를 끄적끄적이며 구현 중에 (Watch와 Multi와 함께라면),
Spring 진영에 잘 구현이 되어 있어서 쉽게 가져와서 요구사항에 맞게 사용을 했었다.
이미 잘 만들어져서 역할을 잘하고 있으면 빠르게 잘 사용하는 게 어려운 거구나 다시금 느꼈다.
추가로 한 번 고민해야 할 부분
Gateway에서 Request body를 읽어서 무언가를 처리 한 후에 다음 Filter로 넘겨 줄 때에는 고민을 해봐야하는데,
잘 알다시피 Servlet Request Body를 Filter에서 한 번 읽으면,
다시 뒤에서 body를 못 읽는다는 문제가 있다.
이 부분은 한 번 읽고 body를 캐싱 해서 다시 body를 넣어주는 추가 작업이 필요하다.
참고
가상 면접 사례로 배우는 대규모 시스템 설계
Spring Cloud gateway Docs
https://redis.io/docs/manual/programmability/eval-intro/